Welcome to our step by step guide for using your booking system within your Primarysite Website.
This document will help you achieve all these things in an easy step by step process. If you have any questions, please get in touch.
Before we look at setting up an event within the booking system, you must firstly make sure the data you are using is correct within the MIS system used in school.
- Please do read and have a look at 'using your contacts area' guide in the communication options section
Creating your Booking Form Event
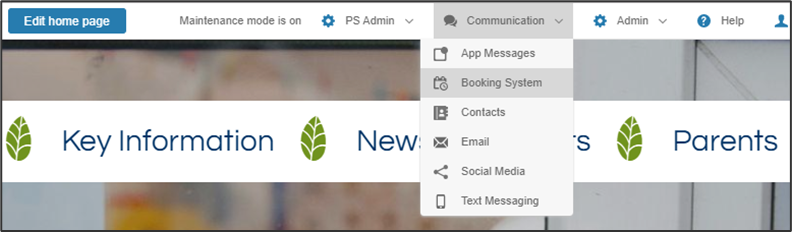
Once your data is in place you can then begin to create your parents’ evening booking event. To do this, you will need to go to the booking system itself located in the ‘Communication’ tab and titled ‘Booking System’.
Please be aware that our booking system will go through two updates daily, these updates are at the same time as the contacts area updating itself. These updates will start at 9am and 3pm (GMT). This updated data will not be seen straight away at these times, you will need to check thereafter.
An example of how this works; your SIMS data is updated within school at 4:30pm, this will then be picked up in the contacts area during the first automatic update the next day, which starts at 9am. Once this is completed the new data will show in your contact area. The email address associated with this user would then get picked up for use within the booking system.
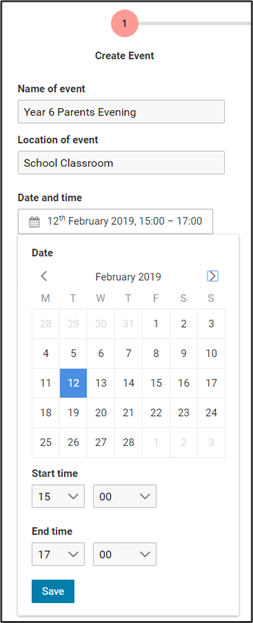
Start by giving the event a name, such as ‘Year 6 Parents’ Evening’, and select the date and start/ end time of your event. There is the option to click ‘Add another date/time’ if you would like this event to occur on two or more days.

Please remember that if you need to add an event that requires the same date being used, but different time slots, e.g. 28th September, parents evening for class 1 from 3pm – 4pm and then 28th September parents evening for class 2 from 4pm – 5pm, that you would need to create two separate events.
It is our recommendation, that an event is created for each individual class and not done as a whole-school event. This does mean you will need to create more events. Managing the time slots booked is then easier and a simple way for each teacher/school to look at.
It is important to schedule enough time for the overall event, considering the number of slots required and the duration of each slot to ensure you have enough. E.G. If you have a 3pm – 5pm event, and you would like 10-minute individual time slots, that will allow for 12 separate people to be seen, providing no breaks have been taken.
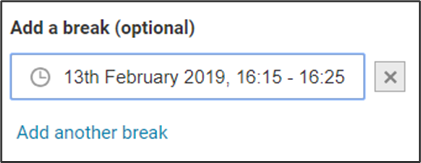
There is an option to add a break within your event. This can be found under the date and time fields.
Please remember that before you can add a break, the date and time fields do need to be populated.
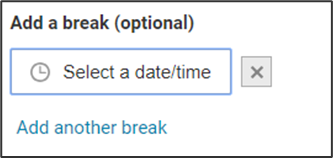
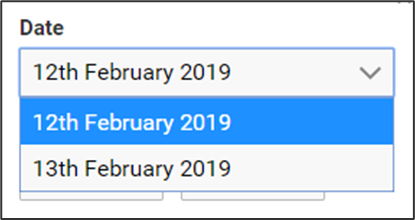
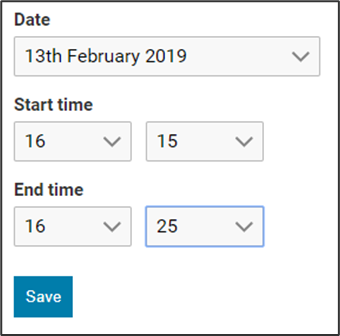
The drop-down field will indicate which date the break will take place on and you can choose from one of the other options in this area if you have set-up multiple dates for the event. You can be specific with the hour and minute of any break.
Please remember, that if you choose to have a break during your event, when it comes to the section for the recipient to choose a specific time slot, any slots that coincide with a break will not be shown as an option for them to book.
There is the ability to add more than one break to an event should you feel this is required.
Please remember to add the location of your event into the location field, which can be found under the ‘name of event’ field and making sure to populate the duration of each slot required for the booking.
The drop-down field for Event booking closes, shows an option for you to select when the last parent/carer can access the event to book their respective slot. There are four options, as default it will always say ‘On event start’. The other options are 24 hours before, 48 hours before and Custom.
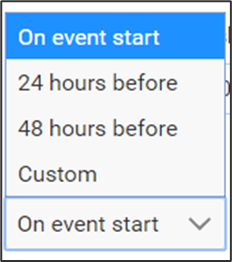
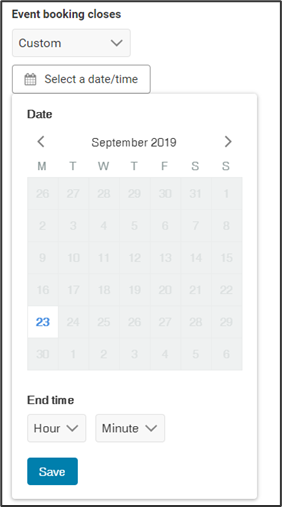
The Custom choice will then allow you to select a specific date and time for the bookings to be closed by.
Please do keep in mind, that when setting an event booking to close, if you have multiple dates included, it will close all the event dates at this specific time.
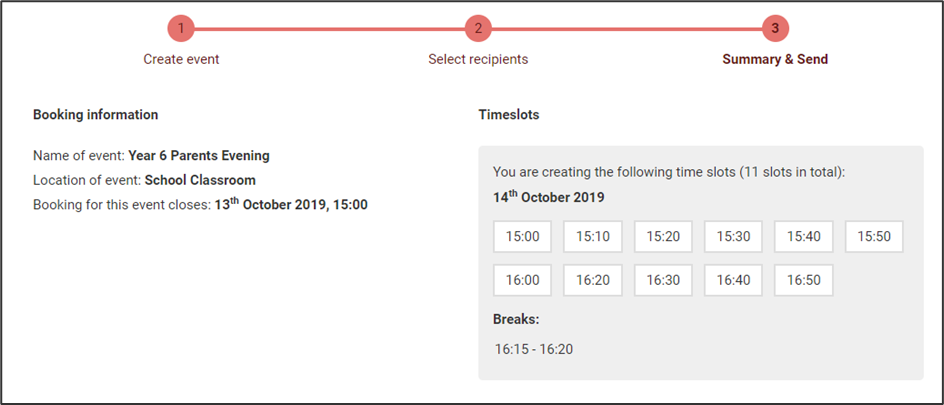
The name of the event, the location, the date and time, adding an optional break, and the duration of each slot, will all come under ‘step 1’ which is highlighted.

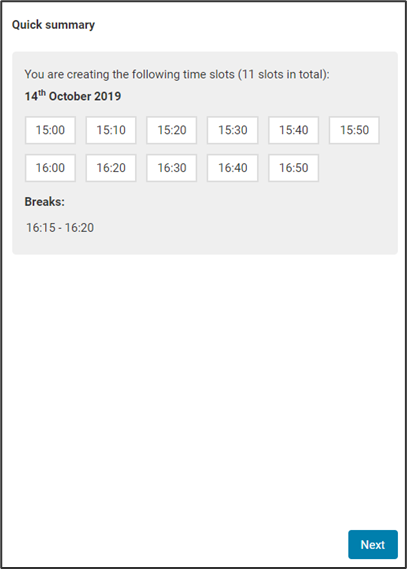
Once the event has been created, a quick summary box will appear on the right-hand side with the time slots available in that event and detail the amount of slots available to be picked, the break time will also show should one have been populated.
If you are happy to proceed with the event, you will then need to click the blue ‘next’ button, and this will move the booking to ‘step 2’.
Inviting Parents & Carers
The next step in creating your event will be to choose who the invites are sent to, and now you will see that ‘step 2’ is highlighted ‘Select recipients’

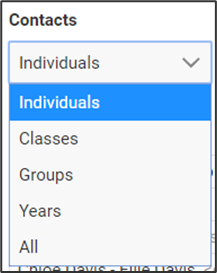
Scroll down to ‘contacts’ and select the relevant contacts from the list, this could be an individual, a class, a group, year or all contacts. (If your Contacts area is not yet populated, please see above information or you can review our managing contacts user guide).
When creating an event, if you have a parent/carer who does not have an email address, they can still be added into the event, please have a look at the choosing time slots section below.
Once the correct contacts have been selected for the event, they will appear on the right-hand side.
To invite those pupils/contacts to the event, please click the blue ‘next’ button. Once clicked, you will see that ‘step 3’ is now highlighted ‘Summary & Send’ and that you have a list of the ‘Timeslots’ for the event, or multiple if more than one day is added, along with any break times. On the left-hand side, it will also detail the name of the event, the location and when the booking form will close for anybody selecting a time slot.
Below this you will then see the ‘Recipients’, the ‘Pupil Name’ and the ‘Contact Name’. If you are happy that the correct recipients are added, you can then click the ‘create event’ button on the right-hand side.
If you think that you might need to make a change to the recipients at this point, you can click the ‘back’ button to amend your invitation list.
Invitation Settings
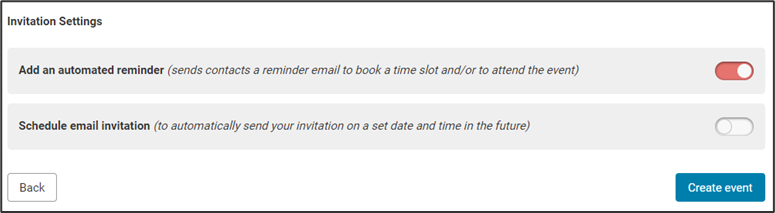
You will see an invitation settings area at the bottom of the screen when you are on step 3 of creating an event ‘summary & send’
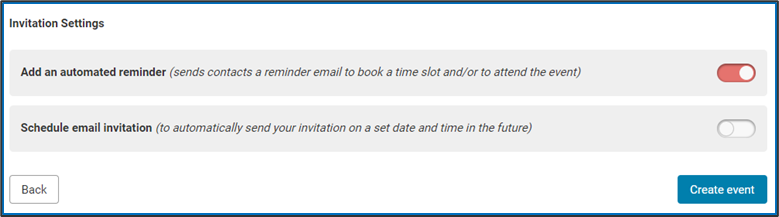
You can see from the screen print that there is a toggle button which can be activated to schedule a preferred date and time for your invitation to go out on.

Should you choose not to use the toggle button and go to press the blue ‘create event’ button, your email invitations will be sent straight away at this point.
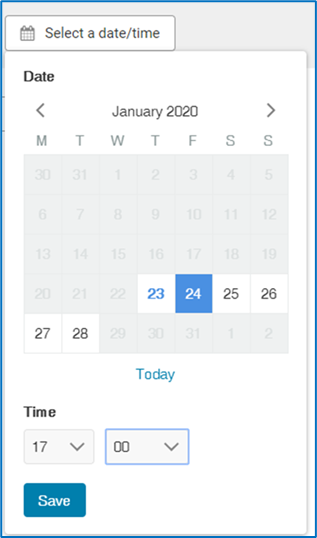
If you click on the toggle button to schedule the email invitation, you can select the date and time for your invitations to be sent.

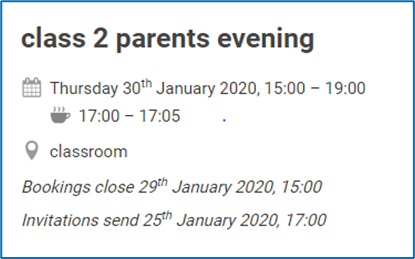
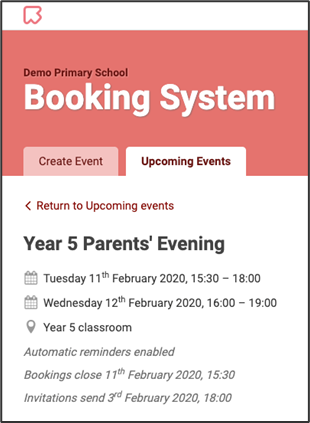
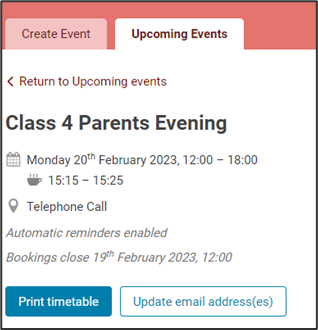
If you choose to create an event whereby the invitations will be scheduled to go out in the future, you will see that the page for the event details on the ‘upcoming events’ tab will show when invitations are to be sent and when bookings will close, along with any break times scheduled and the date and time of the event.
If you choose to use the schedule invitations option, please note that this scheduled time cannot be changed once the event has been created.
You will also see the information underneath this which details the pupil name, contact name and shows the invitation status as being ‘scheduled’ and the time slot status as ‘unbooked’.

As soon as the invitation has been sent, and parents/carers start to choose their preferred time slot, this will change accordingly to show you the slots being booked.

Should you find that you have any contacts without an email address, they will show here under invitation status, as having ‘No email’. You can at this point choose to edit the time slot and book the slot for the parent/carer, if that’s what you have agreed.

If the person now has an email address, you will need to update their email address in your own MIS system and allow for this update to pull over to PrimarySite. Following this, you will need to press the ‘update email address(es)’ button in the event for that person in question and amend the event accordingly.
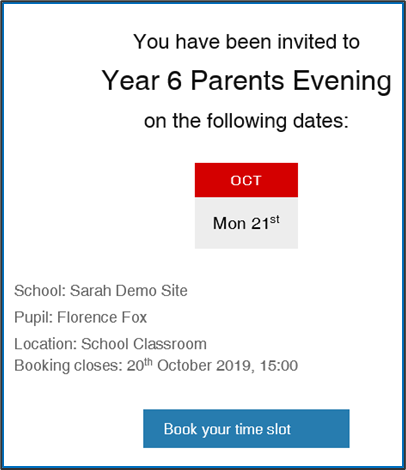
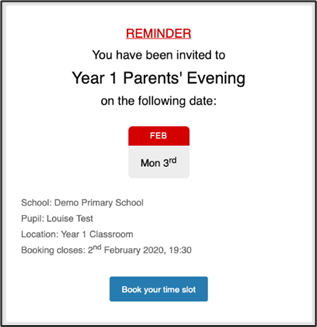
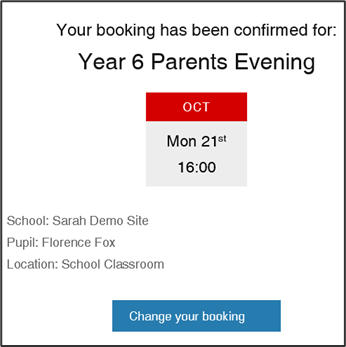
Once you click the ‘Create event’ button, the recipient will then receive an email which, when opened, will look as below. Once the ‘Book your time slot’ button has been selected, you will be redirected to the booking to select a time slot.
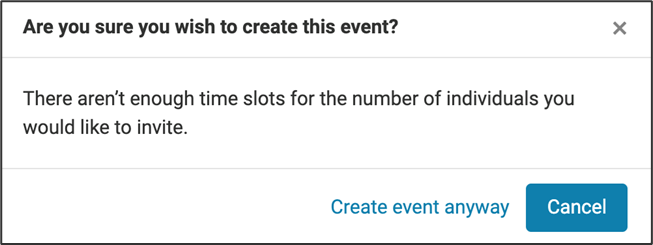
Should you click the blue create event button and you see a pop up to warn you, this will be because at the point of selecting the recipients and organising your time slots, there will not be enough slots created for the amount of invites being sent.
At this point, you will need to click the blue cancel button and then press the back button to go back a step to alter your timings for the event.
Automatic Reminders
When you move onto the third step of creating an event, you will see a section for automatic reminders in the invitation settings area, ‘add an automated reminder’.
By default, you will see that the automatic reminders will be sent for new events created, you can choose to use the toggle button to switch this functionality off before creating the event, turning the toggle button from red to grey.
The reminders that will be sent by the system automatically when this is set for the event are as follows:
- A reminder to book a slot, which will be sent at 6pm, three days before the booking window for the event closes. This will go to any contacts invited to that event who, at the time of sending, have an email address in the system and haven’t booked a slot or replied that they cannot attend.
- A reminder to attend the event, which will be sent at 6pm, one day before the event is due to start. This will go to all contacts with an email address in the system that have a slot booked at the time of sending.
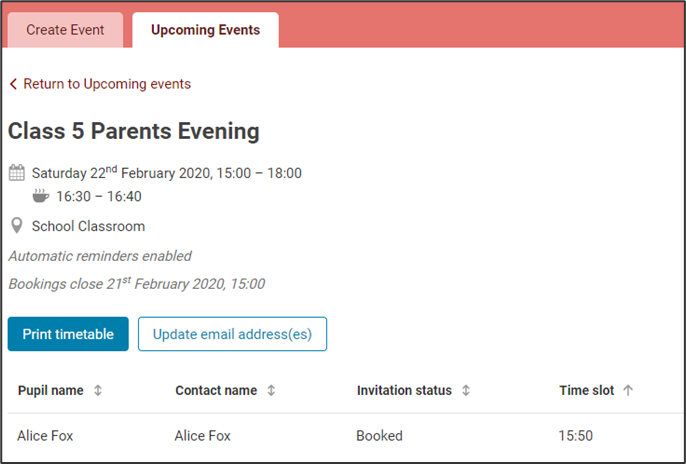
If this functionality is set when the event is created, there will be a note on the details page for the event that the automatic reminders have been enabled.
Meanwhile, as the school, you will then see this message appear:
If a time slot has already been taken by another parent/carer, it will no longer show as a time slot, it will just be missing from this area. You can see from below, that 16:00 is missing as that has been already booked as a slot by another user or there might be a break that has been scheduled, and therefore the time slot will not show at that time.

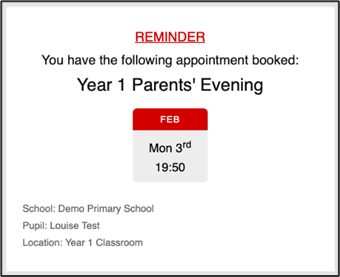
Once they have selected and confirmed their booking, they will receive an on-screen reminder of the date and time they have chosen, followed by an email confirmation.
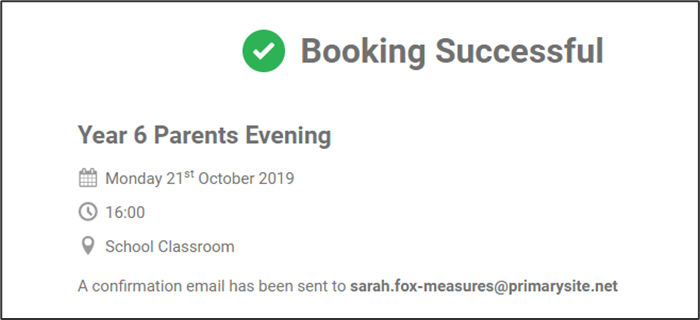
The picked slot will then also be confirmed as booked on the page listing the details of that upcoming event
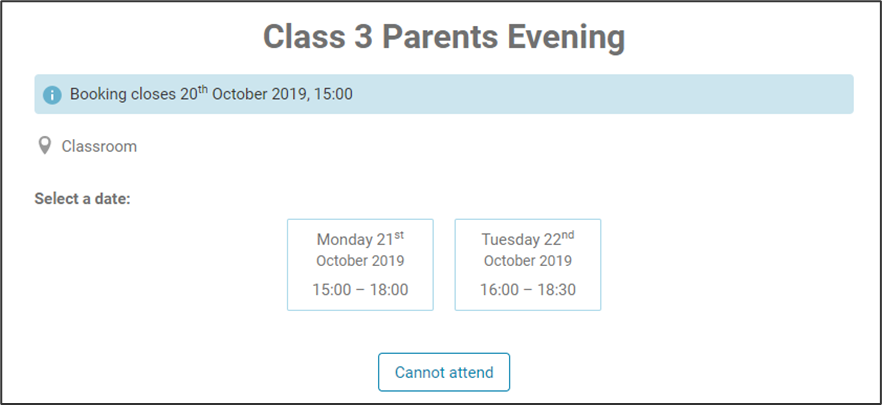
If the event was split over multiple days and one of the days, no longer has any available slots left, this will state that ‘there are no time slots left for this date’. If the bookings for the event in question have closed by this point, the option to select a date and time will no longer be available, and the parent/carer will have to let the school know for separate arrangements to be made.
Cannot Attend An Event
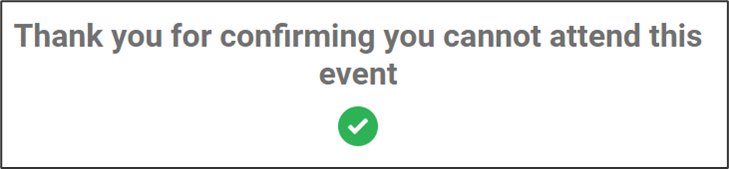
There may be a time where a parent/carer can’t attend the dates that have been submitted by a school, if this is the case, a ‘cannot attend’ button is available to be clicked once the invitation has been sent through.
If the ‘cannot attend’ button is pressed, there is a pop-up message that will appear to confirm you cannot attend the event you have been invited to.
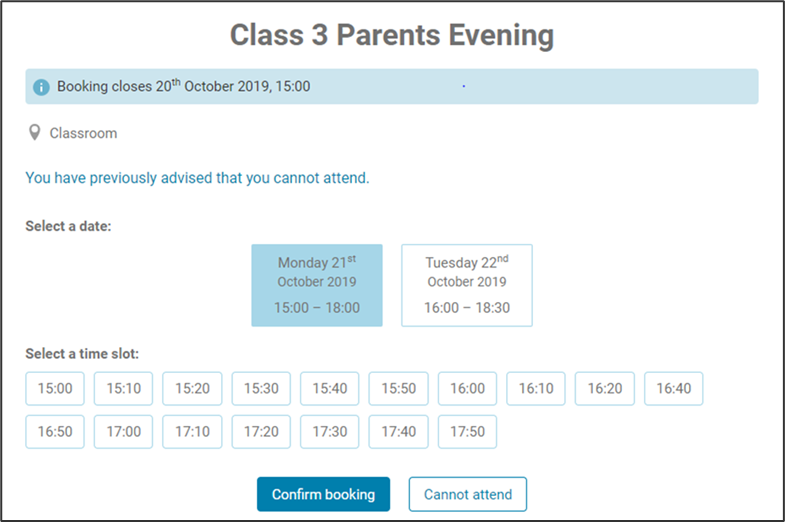
Should circumstances have changed, and you find the event can be attended after all, you have the option to go back and select a slot, from the original invite. There will be a message that says, ‘you previously advised that you cannot attend’, along with the date for the event and the time slots available at that time to choose from.
Choosing Time Slots (Parents/Carers)
To allocate a booking to a parent/carer when they have no associated email address is straight forward. You do not need to create a separate event. If there is no email address attached, these contacts can still be added as part of the original event creation, provided that they are listed as a priority 1 contact on the integration system. This will allow the person that has created the event to manually select a time slot for this parent/carer.
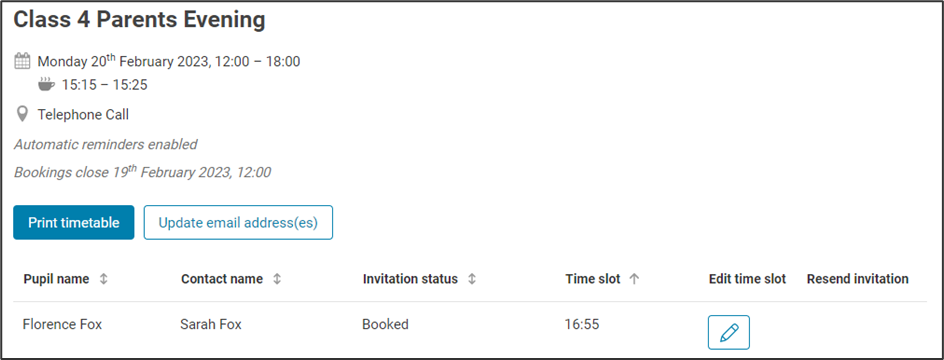
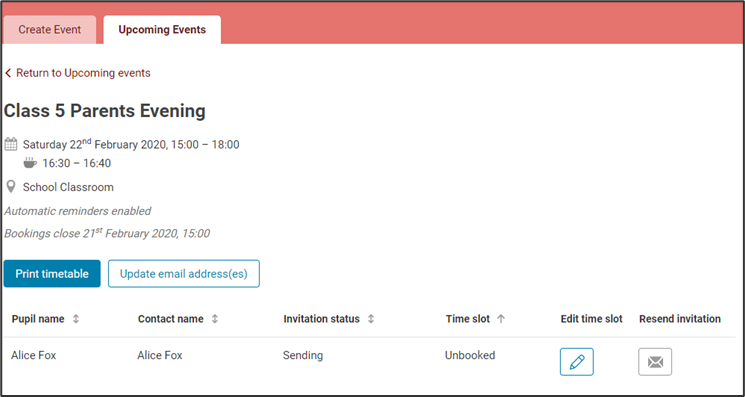
Once your event has been created you will see the below screen.
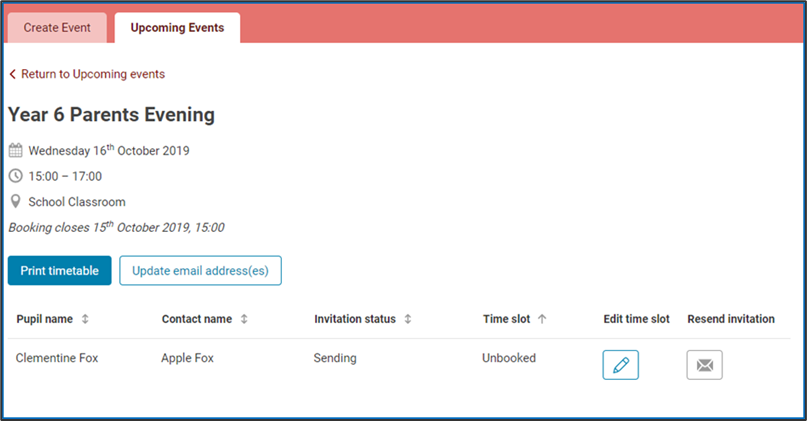
To then manually assign them a time slot, you will need to select the blue pencil next to the pupil in question, which will take you through to the list of available time slots for that parents evening event in the same way that parents would see this through their email invite.
In this area, select the time slot that you wish to give to the parent/carer in question, this will then assign the time slot to them, which you can check by viewing the event in your upcoming events area. With no email address associated to the contact, no emails will be sent or received so it will be your responsibility to inform the parent/carer of their time slot.
Should the time slot that has been chosen on behalf of a parent/carer need to be changed, you can click the ‘change booking’ button or you can ‘cancel the booking’ altogether. Should the slot be changed to another time, you will need to follow the steps as before with choosing a new time slot.
Please also remember that should you wish to choose a time slot for each of your pupil/contacts, you can do this by following the same steps.
If you need to resend the invitation at all, you will need to click the envelope icon button.
Should you have updated an incorrect email in your own MIS system, or popped one in that may have been missing, the invite can be sent to the updated address, if this has gone to an incorrect address or if one was missing to begin with.
This can be done by clicking the ‘update email addresses’ button, which can be seen next to the print timetable button.
Event Overview
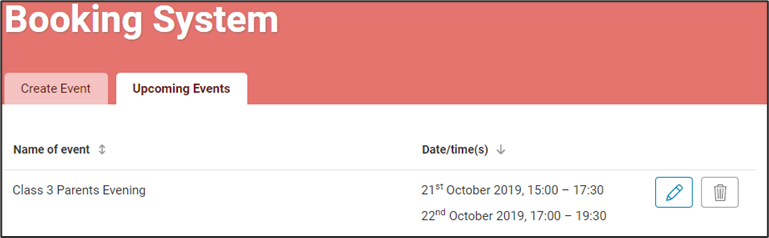
To manage your parents’ evening, go to the ‘Upcoming events’ section within the Booking System. Click on the blue edit pencil to see details of the event, the status of parent’s bookings or to book slots on behalf of parents.
You can also click on the ‘Print timetable’ button to print a timetable of the booking in advance of the event.
Deletion of Events
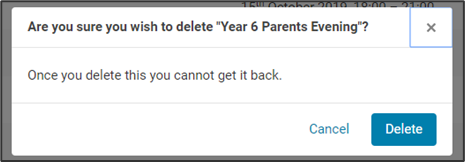
All events that are created will stay in the upcoming events area; these events will not automatically delete once the date for the event has passed.
You can delete an event that has passed by selecting the grey ‘bin’ icon and these events will then disappear from your upcoming events list.